Go-Micro is a RPC based framework, developed to write microservices in go which are ready for distributed system. Before getting into the details of how to write microservices using go-micro, lets discuss why go-micro exists and to answer this question lets discuss how microservices work on enterprises level
Microservices in Enterprise
Lets assume we have a company which is building a system to manage jobs being given to its employees. The system architect decides to write microservices to handle different things in the system. He has identified three microservices
- Account service
- Job service
- Payment service

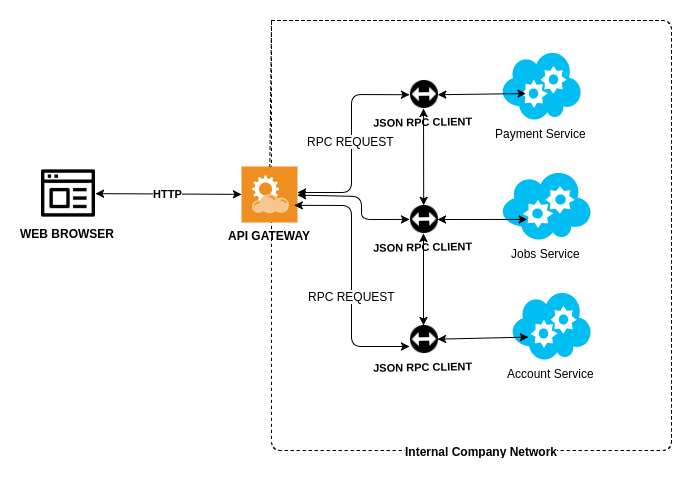
These services will handle creating new users, creating jobs for them, assigning jobs to users and making payments to users. This is fairly basic setup. We will not go into the details of how to write code but focus on the fact we have 3 microservices to handle different business logic of the system.
These microservices have to communicate with each other to transfer data. This transfer of data is internal, which means they are talking to each other internally. To explain it further these microservices are part of internal network and not yet exposed to outer world. For internal microservices communication RPC is used. There is great article explaining why to use RPC for internal APIs. For inter service data transfer protobuf is used. Protobuf is data serialisation format like JSON. Here is a great article detailing why protobuf is better than json for services.

Now users have to access the system, so web based frontend is developed (in angular or any preferred ui framework). Frontend need API to access data. An Api-layer is added which will call these RPC services aggregate the data and return to the frontend
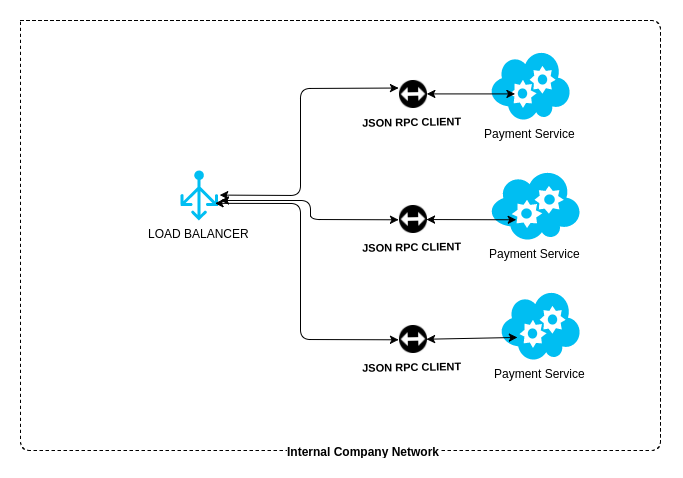
This setup will allow you to scale individual microservice based on the load it is receiving. We can add more servers running the service and distribute the load amongst them and take down those servers when load reduces. This is how auto scaling work in cloud. There are two ways in which your system can handle this addition(auto-scalling) of new servers.
- Server side load balancing
- Client side load balancing
In server side load balancing we will add a load balancer in front of our service and it will handle new servers being added and removed. We have RPC clients written for every service which is used by other services to transfer data
In client side load balancing we use registry pattren, in which information of the new services is added to a common key-store (consul, etcd etc) and RPC clients use this registry to access available services.
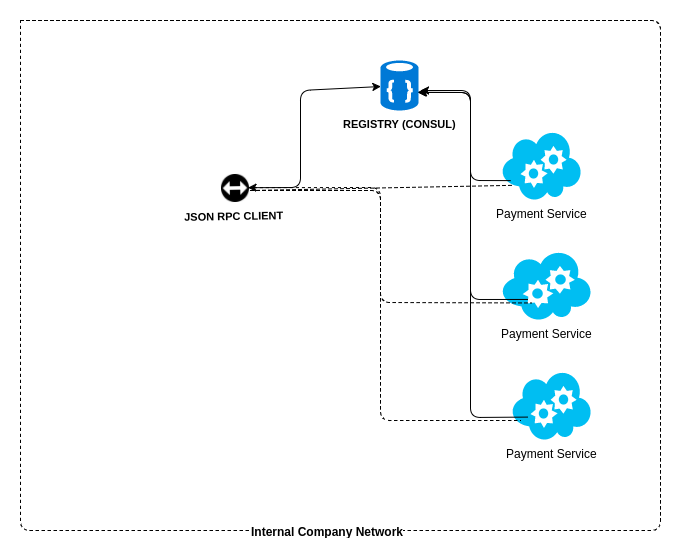
RPC client will get the list of servers running a service and maintain a round-robin approach to call the next available server. RPC client is handling the load balancing and every new server added to the infrastructure registers itself in the registry. Registry will provide the list of available servers and their URLs
This is a very brief example, in real world we have hundreds of servers running under one service. Lets discuss how Go-Micro will help us make our services ready for a setup like this.
Go Micro to fill the gaps
Go-Micro framework has all the components to support the enterprise microservice ecosystem.
- Service Discovery – Automatic registration and name resolution with service discovery
- Load Balancing – Smart client side load balancing of services built on discovery
- Synchronous Comms – RPC based communication with support for bidirectional streaming
- Asynchronous Comms – PubSub interface built in for event driven architectures
- Message Encoding – Dynamic encoding based on content-type with protobuf and json out of the box
- Service Interface – All features are packaged in a simple high level interface for developing microservices
Lets write our microservice
Our microservice will have three components provided by go-micro
- Server – The server is the basic building block for writing a service. It is used to name your service, register request handlers, add middeware, etc. The built in server in go-micro is an RPC system.
- Client – The client provides an interface for other microservices to make requests to our services. It is used for finding services by name using the registry, load balancing using the selector.
- Service – The service builds on the above packages to provide a unified interface for serving requests. It wraps all the underlying packages of Go Micro into a single convenient interface.
Step 1 : setup development environment
We need to set up our environment, I use docker for my development and I have written a post on How to setup go-micro with docker compose. We will use the same Dockerfile.
Following is my Dockerfile and Docker-compose.yml to build a docker container with Go Micro and Micro Web.
Dockerfile
FROM golang:1.8

# Protoc version to install
ENV VERSION 3.3.0

# Install unzip, required to unzip the protoc zip
RUN apt-get update && \
    apt-get upgrade -y -o Dpkg::Options::="--force-confold" && \
    apt-get install -y unzip && \
    apt-get clean && apt-get autoremove -y && \
    rm -rf /var/lib/apt/lists/* /tmp/* /var/tmp/*

# Download and install protoc
RUN wget https://github.com/google/protobuf/releases/download/v$&;VERSION/protoc-$&;VERSION-linux-x86_64.zip && \
   unzip protoc-$&;VERSION-linux-x86_64.zip && \
   rm -f protoc-$&;VERSION-linux-x86_64.zip

RUN go get github.com/codegangsta/gin

RUN mkdir -p /go/src/github.com/rajdeol/go-micro-hello-world
COPY . /go/src/github.com/rajdeol/go-micro-hello-world
WORKDIR /go/src/github.com/rajdeol/go-micro-hello-world

EXPOSE 3000
- We have added golang version 1.8 in our Dockerfile and after that we have installed protoc. We will use protoc to generate go code from proto files.
- There is detailed documentation on how to write and organise go code on golang.org according to that code of our first service will be available at github.com/rajdeol/go-micro-hello-world. We have created the directory structure for our service and then copied the code into the directory structure and exposed the port 3000.
- We will use gin which is a small command line tool to live reload and compile go code when it is modified. This will help us in development, our changes will be visible as soon as we made them, no need to manually recompile or build.
- For dependency management we will use glide. It is a package manager for go. All the dependencies for the service will be declared in glide.yml file.
Now we will write our docker-compose.yml file to bring up Go Micro framework and supporting components.
Docker-compose.yml
###################################
# Cousul will be used to register service
consul:
  image: consul:latest
  command: consul agent -dev -log-level=warn -ui -client=0.0.0.0
  hostname: consul
  ports:
    - "8500:8500"
##################################
# Message broker
rabbit:
  image: rabbitmq:management
  hostname: rabbit
  ports:
    - "5672:5672"
    - "15672:15672"

###################################
# Micro web to view and query service from web dashboard
microweb:
  image: microhq/micro
  command: web --address=0.0.0.0:8080
  ports:
    - "80:8080"
  environment:
    - MICRO_REGISTRY=consul
    - MICRO_REGISTRY_ADDRESS=consul
    - MICRO_API_NAMESPACE=gomicro.api
  links:
    - consul
    - service.helloworld

###################################
# Our basic Helloworld service
service.helloworld:
  build: .
  command: gin --immediate --path /go/src/github.com/rajdeol/go-micro-hello-world go run main.go
  ports:
    - "3000:3000"
    - "8081:8080"
  volumes:
    - .:/go/src/github.com/rajdeol/go-micro-hello-world
  environment:
    - MICRO_REGISTRY=consul
    - MICRO_REGISTRY_ADDRESS=consul
    - MICRO_BROKER=rabbitmq
    - MICRO_BROKER_ADDRESS=amqp://guest:guest@rabbit:5672
  links:
    - consul
    - rabbit
We have added containers for consul, rabbitmq, microweb and our hello-world service. Now before we can start building our container we need to write our hello-world service.
Create a file named main.go and add the following code, we will update this file later.
package main

import (
  "fmt"
)

func main() {
  fmt.Println("Hello, world")
}
Now we will run our environment so that we can start our development. Run the following commands in your project directory
docker-compose pull
The above command will download all the docker images that we have specified in the docker-compose.yml file
docker-compose build --pull --force-rm
The above command will build the containers based on the Dockerfile so that we can start using it.
docker-compose up
The above command will bring up our containers
Step 2 : setup dependency downloading
We are using glide to handle and manage our project dependencies. We will use few public libraries and go-micro components in our service. Create a file named “glide.yml” in the project folder with the following code.
package: github.com/rajdeol/go-micro-hello-world
import:
- package: github.com/micro/go-micro
  version: ^0.1.2
  subpackages:
  - server
- package: github.com/micro/go-plugins
  version: ^0.3.0
  subpackages:
  - broker/rabbitmq
- package: golang.org/x/net
  subpackages:
  - context
You can install glide and run it to download the dependencies, however we can create a container running glide and download dependencies as well. I have already created a container and it is available in docker hub as “rajdeol/golang-glide”. I have created a shell script to use the glide container and download our dependencies. Following is the code :
#!/bin/bash

docker run --rm \
    --name=glide-$$ \
    -v $(pwd):/go/src/github.com/rajdeol/go-micro-hello-world \
    -v ~/.ssh/id_rsa:/root/.ssh/id_rsa \
    -v ~/.ssh/id_rsa.pub:/root/.ssh/id_rsa.pub \
    -v ~/.ssh/known_hosts:/root/.ssh/known_hosts \
    -w "/go/src/github.com/rajdeol/go-micro-hello-world" \
    rajdeol/golang-glide ${*}
Save this file as glide.sh and run “sh glide.sh install” to download dependencies. This will create “vendor” directory in your project folder.
Step 3 : write the service
Our hello-world service will receive a string as “name” and return the response as a string “message” with string “hello” added to the received name.
This service will provide a “client” which will be used to access this service via RPC. We need to define the methods for this “client” and format of request and response for the methods.
So, lets write proto file to declare our service(client) and the messages it will receive and return. Because this service is greeting to user we will name it as greeter. We will also declare a method name “hello” which will receive the request. Create a folder in the project repository named “proto”. Create another folder inside “proto” folder named “greeter”. Inside greeter folder create a file named greeter.proto
greeter.proto
syntax = "proto3";

service Greeter {
  rpc Hello(HelloRequest) returns (HelloResponse) {}
}

message HelloRequest {
    string name = 1;
}

message HelloResponse {
    string greeting = 1;
}
We will use protoc to generate go code from greeter.proto. Code generation will be required when we create the proto files for the first time or if we have modified the proto files. To make the development easier I have created a shell script “proto.sh” with following code:
#!/bin/bash

echo "Downloading library"
go get github.com/micro/protobuf/{proto,protoc-gen-go}

echo "Generating protobuf"
protoc \
    -I$&;GOPATH/src \
    -I/go/src/github.com/rajdeol/go-micro-hello-world/vendor \
    --go_out=plugins=micro:$&;GOPATH/src \
    $&;GOPATH/src/github.com/rajdeol/go-micro-hello-world/proto/greeter/greeter.proto
Make this file executable
chmod +x proto.sh
We just need to execute this file in our running container. Make sure folder named “vendor” exists in your project root. Run the following command to generate the code:
docker-compose run --rm service.helloworld ./proto.sh
This will generate a new file greeter.pb.go in “proto/greeter/” folder.
main.go
Now we will write our main.go file. Import go-micro library and server component from go-micro.We will also import our generated proto file to access our client and logrus for log messages.
import (
  log "github.com/sirupsen/logrus"
  micro "github.com/micro/go-micro"
  "github.com/micro/go-micro/server"
        greeter "github.com/rajdeol/go-micro-hello-world/proto/greeter"
)
Next step is to write our main function.
var serviceName = "service.helloworld"
func main() {
  log.WithFields(log.Fields{
    "name": serviceName,
  }).Info("Starting service")

  service := micro.NewService(
    micro.Name(serviceName),
    micro.Server(
      server.NewServer(
        server.Name(serviceName),
        server.Address(":8080"),
      ),
    ),
  )

  // setup command line usage
  service.Init()

  // Run server
  if err := service.Run(); err != nil {
    log.Fatal(err)
  }
}
- We have declared our service name in a variable. This will be used for service discovery in service registery (cousul in out setup).
- We have created a server (which will be a wrapper around our service) using server.NewServer listening at port 8080.
- We have then created our service using micro.NewService and passed along service name and our server.
- We have initialised our service by calling service.Init() and then run it by calling service.Run()
This will setup and create our service listening on port 8080, however it will not serve any request. We need to write a handler to handle requests coming via RPC. Our RPC client generated via proto files.
Lets create the handler. Create a folder name “handler” and add a file named handler.go into it with the following code:
package handler

import (
  greeter "github.com/rajdeol/go-micro-hello-world/proto/greeter"

  log "github.com/sirupsen/logrus"
  "golang.org/x/net/context"
)

type GreeterHandler struct {
  serviceName string
}

func NewGreeterHandler(serviceName string) *GreeterHandler {
  return &GreeterHandler{
    serviceName: serviceName,
  }
}

func (s *GreeterHandler) Hello(ctx context.Context, req *greeter.HelloRequest, rsp *greeter.HelloResponse) error {
  log.WithFields(log.Fields{
    "name":         s.serviceName,
    "HelloRequest": req,
  }).Info("GreeterHandler:Hello")
  return nil
}
Few things to notice here, our handler is implementing interface “GreeterHandler” automatically generated from proto file. So we have created a public function “Hello” with same signature in the interface. Function “Hello” receives greeter.HelloRequest and greeter.HelloResponse.
Lets update our function main in main.go file and register our handler and client with server. Our generated proto code has function “RegisterGreeterHandler” to do that.
// Register Handlers
greeter.RegisterGreeterHandler(service.Server(), handler.NewGreeterHandler(serviceName))
Import the handler which we have created in the main.go file. Our updated main.go file will now look like
package main

import (
  log "github.com/sirupsen/logrus"

  handler "github.com/rajdeol/go-micro-hello-world/handler"
  greeter "github.com/rajdeol/go-micro-hello-world/proto/greeter"

  micro "github.com/micro/go-micro"
  "github.com/micro/go-micro/server"
  _ "github.com/micro/go-plugins/broker/rabbitmq"
  _ "github.com/micro/go-plugins/registry/kubernetes"
)

var serviceName = "service.helloworld"

func main() {
  log.WithFields(log.Fields{
    "name": serviceName,
  }).Info("Starting service")

  service := micro.NewService(
    micro.Name(serviceName),
    micro.Server(
      server.NewServer(
        server.Name(serviceName),
        server.Address(":8080"),
      ),
    ),
  )

  // Register Handlers
  greeter.RegisterGreeterHandler(service.Server(), handler.NewGreeterHandler(serviceName))

  // setup command line usage
  service.Init()

  // Run server
  if err := service.Run(); err != nil {
    log.Fatal(err)
  }
}
Before we can test our service we need to update our handler. We want our service to receive a name string and respond back by adding “Hello” to the name string. Updated “Hello” function in the handler will now look like
func (s *GreeterHandler) Hello(ctx context.Context, req *greeter.HelloRequest, rsp *greeter.HelloResponse) error {
  log.WithFields(log.Fields{
    "name":         s.serviceName,
    "HelloRequest": req,
  }).Info("GreeterHandler:Hello")
        rsp.Greeting = "Hello" + req.Name
  return nil
}
Testing our service
Now open the browser and open http://localhost/ you will see the micro-web UI. We will use this to test our service. Please follow my post go-micro with docker compose for details on how to use micro-web to test our service.
All the code related to this post is at my github repository go-micro-hello-world.


No Responses to “Writing Your First Service in Golang Go-Micro”